Showing posts with label Edtech. Show all posts

Thursday, October 6, 2016

Growing Better Writers Through Blogging

Today, we picked up on a project that we started last year...blogging.  I am thrilled to say that as I watched the lesson unfold, I saw real learning happening for our sixth grade students.  According to last year's teacher, the hardest part of blogging for our young writers was providing quality comments.  So, where did we start today?  You guessed it, with commenting.

Our Grade 6 teacher, Mrs. Downs, created her own post using only a graphic image and invited the students to share their thoughts.  No guidelines were stipulated regarding the length of the post nor were reminders given about sentence structure.  The directions...look at the image and comment.


The students' writing began to flood the screen.  From short posts to creative rhymes, student personalities began to shine through with each entry made.

The most beautiful part however, was that students provided the material for the day's lesson on grammar, syntax, and quality writing.  Take, for example, these 3 comments to one student's response:


"Do the comments make sense grammatically?  Is punctuation missing?  Should sentences begin with a capital letter?"  As Mrs. Downs, asked probing questions while reviewing the students' first attempt, we could see light bulbs coming on across the room, as well as, the strong desire to correct mistakes made.  After Mrs. Downs invited the young writers to edit and revise, the students' comments became more thoughtful...more conversational...more grammatically correct!


Are they perfect?  No, but we are not looking for perfection; we are looking for growth.

Sunday, October 2, 2016

Engaging Learners in Virtual Tours with ClassFlow

I am not sure why I am so enamored with virtual tours, but I have been hooked since Google's visit last year when they came to share Google Expeditions with our 5th and 6th grade students. Maybe it is because it is so easy to get the students engaged in a virtual tour...maybe it is because the students can explore places they have never been...maybe it is because virtual tours not only provide learners with a visual experience, but also an auditory and kinesthetic one, as well.  Based upon my one day experience with Google Expeditions, I can tell you that I am so excited about their recent release for iOS devices.  With their teaching notes, question prompts, and gyroscope compatible pictures for students, it is so easy to integrate Expeditions into the curriculum.  In fact, I invested in 25 ViewMasters and an equal number of iPods in early summer, because I am convinced that this type of learning activity is a game changer for our student population who have limited experiences outside of their own neighborhoods. I feel that if I can take students around the world through interactive pictures, a wealth of opportunities will be unlocked for our students to associate mental pictures with words they read and hear, thus expanding their background knowledge, but not every location is available through Expeditions.

Enter ClassFlow.  About a month ago, I started using ClassFlow, a free online presentation system kind of like an interactive whiteboard, but with built-in assessments, assignment creator, badging, and interactivity tools.  In ClassFlow, there are 2 slide decks available, one on the teacher side (the things that will show up in the front of the room through the projector) and one on the student side (the things that will show up on the students' devices). The 2 slide decks do not have to match and therefore allow for the creation of the customized virtual tour complete with teacher notes and talking points!!!  By embedding links to 360 degree videos and photos on the student side, virtual tours can be built with images with which students can interact.  By including teacher notes or questions on the teacher side of the slide deck, lessons aligned to content standards can be developed with questions or facts designed to keep class discussions on topic.


I shared my first tour, Regions of Texas, with 4th grade students last week.  It was so rewarding as a teacher to hear the students oohs and aahs as they saw the different pictures appear on their devices and honestly, in my 16 years of teaching, I have never introduced something to students that resulted in a similar response.  They were so excited to share what they were seeing with classmates as they moved the images around on their screen that on more than one occasion the teacher turned to apologize to me for the noise.  I assured her, no apologies were needed.  I love to hear engaged students excitedly talking about content!  Next stop...the White House.


Monday, September 26, 2016

Lights, Camera, Action: Welcome, News Crew

What a start to the new year!  It honestly has been a whirlwind of great fun.  Just last week, we celebrated International Dot Day, built amazingly awesome marble runs, made liquid nitrogen ice cream, and were featured on the news!!!


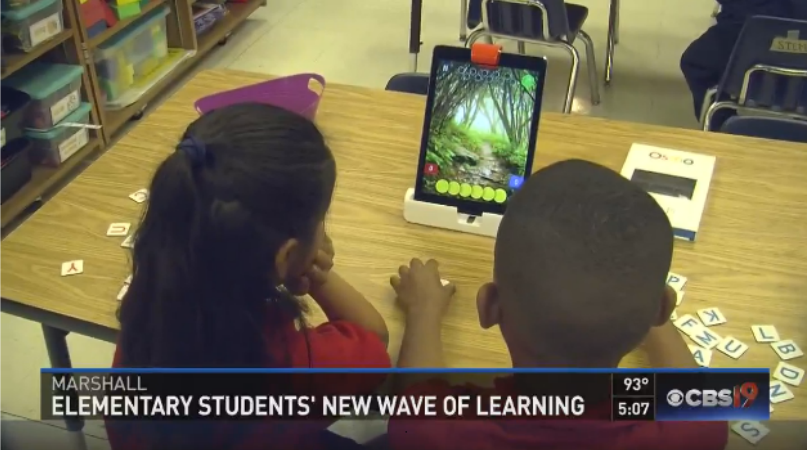
CBS 19, a local news station, visited one of the schools with which I work to see how teachers and students are using augmented reality to bring learning to life with Osmo.
Osmo, one of my favorite tools to use in K - 2 classrooms, gets results by providing practice opportunities for students in spelling and numeracy and challenges student thinking through the coding and tangrams apps.


The students and teachers love it!  Osmo is perfect for center rotations and with its 7 different apps, students are always excited to use it.
See our story here.

Friday, September 9, 2016

Giving Students Out of This World Experiences with Augmented and Virtual Realities Using Quiver Vision, Osmo, zSpace, and ClassFlow

School has been in session just 3 weeks in our district and already our students are immersed in augmented and virtual realities. These technologies are impacting student learning in classrooms around the globe, so why not in a tiny town in Texas? Experiencing augmented or virtual reality makes you feel as though you have stepped into a Harry Potter movie with paper coming to life and images literally popping out of the computer screen. How fun, right? It doesn't have to cost a ton of money or be "something else" we do. It truly fits naturally into our classrooms to support student learning.

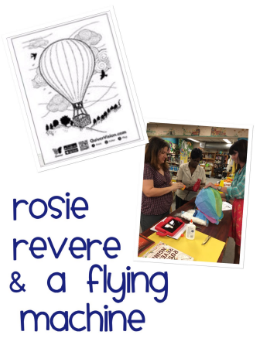
We are using coloring pages by Quiver Vision, formerly known as ColAR, as writing prompts, STEM starters, and review pages in our interactive notebooks. The kids are always delighted when they scan their customized images to see their work come to life with music,movement, and interactive features.  We re-size the images so that time is spent less on coloring and more on guiding students through the writing and design process.

Inspired by Andrea Beatty's book, Rosie Revere, we were challenged to create our own Eggs-eptional Flying Machine

We are also using Osmo, a device that attaches to an iPad, takes interaction to a whole new level. LoVe!!! In this gamified application,  students use included tiles to practice spelling words, acquire new vocabulary, reinforce math skills, expand spatial awareness, learn coding, explore STEM concepts, and make works of art…all while “playing”.  


Literally, we CaNNoT get EnOUgH of Mo! Students love it and the academic benefits have helped students of all abilities exceed academic expectations in spelling and math.  

Finally, to see graphics jump out of a computer and into the space in front of your face, you must see zSpace! Loaded with hundreds of lesson plans and labs for math and science, this equipment allows students to interact with models in way that would have otherwise been cost prohibitive.  From frog dissections to exploration of the human brain, learning environments are transformed by these highly engaging student experiences.


AR Circuits
 
Regardless of budget, teachers and students can experience augmented reality.  Inexpensive apps like AR Circuits and AR Flashcards (for addition, letter recognition, space, and more) can be used to create a whole different experience for students.  Place the apps' free images into an interactive presentation software such as ClassFlow or print tangible cards using copy paper and you will immediately see increased excitement and engagement in classroom learning stations.  Pick up a copy of Moonbot Studio’s The Fantastic Flying Books of Mr. Morris Lessmore or borrow that Guinness Book of World Records (years 2013, 2014, or 2015) from your local library to augment your reading nook. Add a VR ViewMaster to a learning center along with some of your favorite VR apps and students are immediately immersed in another culture, habitat, or experience.
With augmented and virtual realities you can do things that you’ve never done and see things that you never thought possible. The ideas are endless and, with this still new technology, the possibilities are great.  It will be interesting to see which augmented application will be developed next to positively impact teaching and learning.

Sunday, March 22, 2015

AppSmashing at #ASCD15


I had heard of AppSmashing, but I had never tried it until today at #ASCD15.  This afternoon, Dr. Bruce Ellis kept us captivated with his recipes for smashing, but as we soon found out....pretty much anything goes!  AppSmashing, also known as layering apps, is the process of using multiple apps in conjunction with one another to complete a final task or project (via Greg Kulowiec).

In AppSmashing, you can use pretty much anything.  When searching for apps to use, free is good, but shouldn't drive the train unless it is a true constraint. As with everything in lesson planning, start with the end in mind and then back it up from there.  The big question should always be, "What is the learning outcome?"

It is okay to think of tools beyond the iTunes store (Yikes! Did I really just say that? Disclaimer: I'm only repeating what I heard, because I secretly adore Apple).  But according to some, there are other resources on the web that are open-ended platforms which allow students to be creative.  It's also important when choosing tools to think about students' strengths and what they like...or don't like. For example, if students don't like hearing their voice, give them the option of modifying their voice with an app like Change My Voice.  If they don't like seeing themselves on camera, allow them to use an avatar or simply add audio to images.  Bottom line: be flexible, because


it's about the content and lesson objectives, not the technology tool.

Start with determining what you want your kids to learn, demonstrate, or analyze?  Got an idea? Great, then figure out what app you could use to support your objective... When Dr. Ellis asked session attendees "What apps would you recommend having with you if you were stranded on a deserted island with your students?" here is what we came up with (after getting past the idea of being on an island...with students!!!):


He added to our list:

and then added even more:

Again, it is not about the app, it is about the end goal: students interacting with content in new and innovative ways.

It turns out that AppSmashing is pretty straightforward. First, create content with an app and save to the camera roll. Then, create content with another app and again save to the camera roll. Finally, use a third app to merge the first two products and edit...then...save to the camera roll. Repeat, as needed. That's it! That's AppSmashing! Here is one recipe involving only 2 apps to get you started, Dr. Ellis' presentation with samples on the last several slides, and tons more on Pinterest:


So, what will you smash? Have you already done this? I would love to see what you or your students have done!

7 Super Tech Tools Spied at #ASCD15

I feel like a kid in the candy store at #ASCD15 as I go from session to session, tour the exhibit hall, and network with awesome educators from around the world.  I truly feel like the luckiest girl in the world to have the opportunity to learn from so many!  My favorite sessions have been the ones that were hands-on, engaging, and packed with technology, of course. (You know that I am a geek at heart!)  I ran across tons of new tools, but I have narrowed down my list to what I think are the Super 7.  So, here they are... in no certain order, the 7 Super Tech Tools I Spied at #ASCD15:

1.  Plickers - Collect real-time formative assessment without student devices! Give each student a printed card unique to them. Ask a question.  Have students hold up their "vote". Scan the room with your iOS device and... voila...all student responses are recorded.  Genius!

2.  EdPuzzle -EdPuzzle allows a teacher to insert audio notes and embed questions into a video of your choosing.  Questions may be multiple choice or open ended thus allowing for a "check for understanding" while the students are viewing.  It also allows you to see who has viewed the video and how they responded to the embedded questions.
3.  Photo Math - PhotoMath helps students solve equations any place  and at any time.  Simply scan a math problem with the app and see how to work it out step by step. I have used an online platform for independent math practice for the past several years. One of my students favorite features in the web-based tool is the "Help Me Solve This" option.  PhotoMath takes the same idea and puts the "Help Me Solve This" button directly in students' hands.

4.  AdobeVoice - AdobeVoice makes projects with backgrounds, photos, music, and voice overs a snap to create and it allows your design to be saved directly to your camera roll!

5.  Pixel Press Floors - Love! Love! Love! This app allows students to turn their drawings into an original video game that is playable!!! I am so excited to roll this out in our Makerspace.  The kids are going to love this.


6.  Discovery Education's STEM Camp Resources - Discovery Education has done it again.  If you are thinking of hosting a summer camp, starting an after-school club focused on STEM, or even just looking for resources to use in your own classroom, definitely check out DE's STEM Camp Curriculum.

This all encompassing resource includes detailed guides to running a week long camp, From a daily schedule to links to digital resources, DE has provided everything you need to be successful.

7.  Tricider - Tricider allows you to pose a question and then invite others to answer and then vote on what they think is the best response. I know you are probably thinking, "How can I use this in the classroom?"  Well, I recently had the opportunity to visit a Master Teacher's English classroom at East High School in Memphis.  While there, I saw this incredible educator lead her students through a character analysis.  In the activity, the teacher would ask a question, allow for a response, and then quickly fire off, "How do you know?" or "What made you think that?"  She was fishing for textual evidence.  Tricider with its "Pros and Cons" section might be the perfect place for students to voice an opinion, provide textual evidence to support their thoughts, and then respond to other students' responses.

Tuesday, March 17, 2015

10 Ways to Use Video to Boost Instructor Presence in an Online Environment

Okay, if you have been following my blog for the last month or so, you know that I have been participating in free professional development through a MOOC called Tinker, Make, & Learn, a course focused on developing a Makerspace.  Well, the course ended...but not the desire to continue to build our new space.  I promise I will be posting our latest make before the week's end!!! In the meantime, I thought I would share what I am learning now in a course called Humanizing Online Instruction: The #HumanMOOC.

Technically, it is a course for online instructors, but the information could apply to any classroom. Take this week for example...our topic: Establishing Instructor Presence.  In an online environment, learner isolation is one of the primary reasons students choose not to continue in a web-based program, but an instructor can help combat the isolation by humanizing the learning experience.  So, what does that mean?  The teacher can ensure that students know that course material has not just been launched out into who knows where by a professor in a galaxy far, far away, but that a real, live person is on the other end carefully planning and teaching.

One of the ways suggested to boost instructor presence is through the utilization of  video.  Video allows people to see and hear you and if students can see you and hear you, they feel as if they know you.  If they feel as if they know you, they are more likely to approach you.  Being more of a traditional K-12 girl (not online teacher anymore), I began to think about others besides just my students that I wanted to "get to know me"...the parents being at the top of my list!  I think often times parents want to support their kiddos, but they are not sure quite how to help.  The same types of videos that an instructor might create for students could be shared on the K-12 educator's parent portal...just a thought:)

So, video? Yes!  Think about the last email you received. Unless it is filled with emojis and exclamation marks, it is hard to read into it the verbal and non-verbal cues that one would normally recognize in a face-to-face interaction. Video is much more powerful than text alone.  Even asynchronous one way video begins to feel like a conversation when students and parents view this type of communication regularly.

How can you use video to boost instructor presence in the K-12 classroom???  Here are the top 10 ideas shared by Tracy Schaelen, online instructor for Southwestern College (I've linked to some of her videos so that you can see examples):
1)  Use video on your website as a greeting prior to the course beginning - think about the anxiety this could alleviate!  It is a great way to welcome new parents and students and for them to "see" you before arriving on the first day of school.
2) Conduct a course tour via video.  This is especially helpful at the beginning of the course so that students and parents can see how to navigate through the online environment associated with the class.  You can demonstrate how to access grades, see the syllabus, find class notes, and turn in digital assignments.
3) Use video to introduce a new unit of study.  Whether teaching online or in a traditional setting, peaking a student's interest is key. It could be like a movie trailer of sorts that gets students excited about what is to come.  It also provides an entry point for parents.  If parents see where you are going, they can get involved, read up on the topic with their child, share resources, pull images and videos, and help connect the dots for students.  Dialogue can changed from, "How was school today?" to "Tell me about ______.  Did you get to the ______  yet?"
4) Make announcements using video to personalize messages and allow viewers to see facial expressions and hear the instructor's tone of voice.
5) Use video to provide feedback on student work thus allowing you to make the same type of comments you would make normally, but with much more detail.  Ms. Schaelen suggested using props with numbers on them, so that a student can quickly find the markers before each comment. Feedback video should be kept unlisted to ensure privacy.
6) Create "how-to" videos. This particular video is for students and shows how to find and use video feedback.
7)  Make a video to introduce a research assignment, major project, or special event in the classroom.
8)  Use student created videos to demonstrate understanding, add to an electronic portfolio, peer tutor, or build resources for those needing extra support.
9)  Video a guest presenter.  As a high school teacher, I want my students to connect with college admissions counselors.  On several occasions, an invited counselor could visit only one of the 6 classes I taught; while I was happy that 25 students heard from the admissions counselor, I found myself wishing that ALL of the kids could benefit from the information. Video would be a perfect way to capture and share the guest's visit.
10) Use snippets of video from various locations throughout the course to allow students and parents to get to know you even better.  Consider sharing video from your latest 5K, your weekend excursion, or something you saw that you thought was interesting.

Why? "Showing" is powerful.  Videos help students and parents build a personal connection with the instructor and make content, announcements, and details accessible anytime and anyplace (everything I believe in!!!) So, I guess the question I need to ask next is "What will I video today?"


Monday, July 14, 2014

Link Student-Created Videos to Study Guide w/ QR Codes

I am so excited to share with you this week's #Made4Math post, because it is not something that I made at all...it is something created by StuDEnTs (I just helped facilitate)!!!  If you have read for any length of time, you know I love projects in which students create videos to explain the ins and outs of solving a specific problem.  We have created math projects filmed as a silent movie, stop motion animation, and just plain old screencasts.  In fact, there is not a week that goes by in which students are not required to utilize technology to demonstrate learning, because I truly believe...


you learn 95% of what you teach, even if you are teaching to an audience via video.  So, to prep for the college Trig final this year, I handed students a 20 question Study Guide and taped a sheet of paper with a table numbered 1-20 to the classroom door.


I invited them to sign up to demo one of the questions on the Study Guide...with a partner, of course (to hold their phone).  The students, now pros at explaining mathematical "how-to's" and "why's" eagerly volunteered to explain a problem (well, let's be real for a moment...these were seniors about to fly the coop so, I offered bonus points - something I rarely, if ever do - to everyone who actually spoke and demonstrated their mathematical prowess in the video).  It was amazing to see how quickly the students volunteered to explain how to work a problem of their choosing!

The students uploaded their videos to You Tube (something else they learned this year) and then shared the link via a Google Form.  I created a QR Code  of their link using QRStuff and took a screenshot of the code (it also let's you save the image if you want).


I inserted the image into the corresponding square of a clean copy of the original table numbered 1 - 20.


The QR Code Table was shared with each of the students and updated regularly until all of the student videos were added.  It has always been a dream of mine to be able to hand students a Study Guide and a sheet with links to relevant student-created videos to support their studies.  So, this was my year!!!  I really had students sitting in class wearing earphones and using a cell phone to scan QR codes to watch their friends explain math problems.  It still makes me smile in July!

Sunday, July 13, 2014

Evernote 101: Publish To A Blog

Evernote, Evernote, Evernote!  Every where I turn someone seems to be talking about Evernote, but why? Yesterday was the day that I started my quest to figure it out and answer my UltiMaTe BiG QueSTioN: How do I use Evernote with students and teachers at school?

Let me back up even further...In 2012, I was on my treadmill (yes, that probably WaS the last time...) listening to Classroom 2.0 Live featuring Linda Yollis, a teacher of 3rd grade students in California.  The topic: blogging with students.  Let me state the obvious...she was so phenomenal that I still remember the conversation 2 years later!


Blogging?  In the vodcast, she stated that any class could blog, because blogging provides an opportunity to teach and practice quality writing (great for any content area and any grade level).  Blogging gives students an opportunity to produce quality posts for an authentic audience from around the world helping to build a global community.  By design, it provides
Image from Mrs. Yollis' Blog
opportunities for differentiation and it gets kids reading and writing about things that interest them (my mother-in-law, a retired librarian, says that this is critical).

So, what does this have to do with Evernote? Well, when researching ways to share a note in Evernote , I  found that you can publish from within Evernote to Postach.io, a blogging platform.  This is huge!!! I know of several teachers who have wanted to blog with students for some time, but the logistics of how and with what equipment has stalled the progress of the project.

In my mind this is Evernote to the rescue!!! Since you can use any device to add content to Evernote, students can add content to their blog from a computer, a phone, or anything else loaded with the Evernote app!  I had to give it a try...


So, I signed up for Postach.io and 


linked my Postach.io account to my Evernote account.


Postach.io asked if I was sure that I wanted to give it access.  (Don't worry, I can change my mind later if I decide not to use it.)


And then, poof...I was done!


I headed back to Evernote to tag the notes that I wanted to add to the blog as "published".  It was supposed to automatically publish to my Postach.io site, but...  


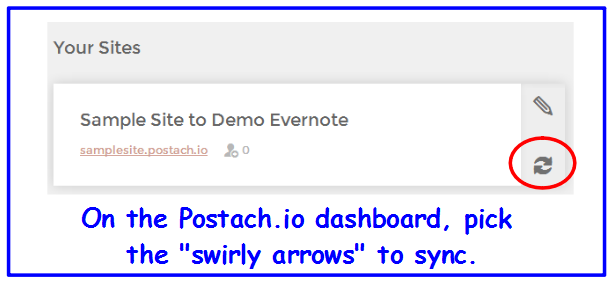
I guess I missed something.  So, I headed back to Postach.io and clicked the "pencil" to edit (though now, I wonder if I could have just hit the swirly arrows to sync...not sure.)


I then went to "Sources" and chose the notebook I wanted to share. The man on the video didn't say anything about selecting just one notebook, so I am not sure if it only possible to share from only one notebook in Evernote, but if so, consider naming it "Postach.io" or "Blog Posts", so that it is clear for students.

Final step, I went back to the Postach.io Dashboard and clicked the arrows beside the blog's name to sync.  Once Postach.io and Evernote are set-up, every note that is tagged as "published" will automatically appear on the blog  (without having to click the "swirly arrows")!   

So, Way #2 to use Evernote with students and teachers: PuBLiSH To A BloG!

Saturday, July 12, 2014

Evernote 101: How to Share Notes Using Evernote

I love summer, a time to think, reflect, and learn!  What can you learn? The possibilities are limitless...you just have to ask, "What do I want to learn today?" (kind of like Siri :)  Some days I know what I want to learn before my feet hit the floor and other days (like today) I'm inspired around mid-morning.

Today, it started with a #NT2t Chat (New to Twitter Chat) this morning where I met Rik Rowe and Dina Moati, who were talking about ways to squeeze all that you wanted to say into 140 characters and Evernote came up. Rik suggested sharing your Evernote notes via Twitter and my first thought was how do you do that?  Thus, the inspiration for "what I want to learn today...": the how-to's of Evernote, not because the web doesn't have tons of resources already on the subject, but because I am simply logging my journey.

I know, I just blogged about Evernote after ISTE, but it was a short post and there was so much more that I wanted to know! My UltiMaTe BiG QueSTioN: How do I use Evernote with students and teachers at school?  My answer..."I don't know...yet.", but I am embarking on a journey to figure it out. So, here I go...my first entry on using Evernote:

  • What is Evernote?
    • A Self-Syncing, Note Taking Tool Available for All of Your Devices: phone, computer, iPad, etc.
    • Cloud-based Utility (It's available anywhere even if you don't have the device that you originally typed your note on).
    • FrEE!!! (A teacher's favorite word!)

  • What Can You Use it For?
    • Quick Notes: shopping lists, pictures of receipts, links to resources, meeting notes, and images of brainstorming sessions.
    • Formatted Notes: Complete with Titles, Font Styles and Colors, Bullets and Numbered Lists, Checklists, Tables, Attachments like Photos and Voice Recordings (these go directly into Evernote when you are using the app on your phone or iPad) and Links to Useful Websites (use the "..." on the tool bar to create a dropdown menu to add the hyperlink)
    • Capture Business Card Info: Use your phone's camera to capture a business card and the information will sync directly into your contacts list.  
    • Reminders: Though it is not a management tool (it is a note taking tool), you can set reminders for time sensitive tasks.


  • Where Do the Notes Go and Are They Private?
    • The notes are in the cloud and this is great because this allows you to access your notes anywhere: work, home, or even the beach by logging into Evernote on a computer or launching the app on your phone or other digital device.
    • You can keep your notes private or choose to share them via Facebook, Twitter, LinkedIn, Email, or with a Link. (Remember...that was my question of the day that prompted this post.)


Here's what I learned...
start by choosing how you want to share.  I picked "link".


Evernote double checked that I meant to click share 
and gives me an option to change my mind after I actually share my note.


Then, it gave me a public link.  
This would be perfect for sharing meeting notes at work! 

Way #1 for answering my UltiMaTe BiG QueSTioN and the answer to "what I wanted to learn today": How to Share Notes in Evernote.  If you would like a copy of my notes for this post, here's my note.

Friday, July 11, 2014

Opus Math...Favorite Find!!!

I have a new love and his name is Opus...Opus Math.  The best thing about Opus is that he is loaded...loaded with math problems aligned for the Common Core along with handy, dandy answer keys! What more could a girl wish for???

Let me tell you how we met...this year, I have had some trepidation as I was tasked with creating new content aligned to the Common Core State Standards (CCSS).  As anyone who wants to make sure that they are not leading a class full of students down the wrong path, I searched and researched to verify that what I was teaching was what the authors of the CCSS intended.   My first find was LearnZillion (bless those precious creators for producing quality content to help boost my confidence as I transitioned to the new standards) and then I stumbled upon Saginaw Valley's pacing guides linked to online resources aligned with the Common Core.  Both were fantastic resources for me to ensure that I was explaining the content in the same manner that someone else did, but I wanted to find yet another place to verify that I was assessing student understanding according to the standards.  After much searching, I found Opus Math!
Logo from Opus Math
Opus Math is a beautiful resource.  You can search for assessment items directly if you know the standards that you want to assess...
or you can search from the whole list of standards to find what you need.  If you choose to search standard by standard, you will see a full description pop-up as you scroll across each one.
After you select the standard you want to assess, you can browse through the questions and choose to include "all" or only specific items.
To create your assessment, scroll down to the bottom of the page to "Make Assignment".  You will be prompted to sign in or make an account (if you didn't already) - don't worry, it's free!
Build your assignment to meet your needs: add a title, class period, teacher's name, etc.
Then, your assignment will download to your computer and you can open it using Microsoft Word or in your Google Drive.  You can continue to edit the assessment items or add more questions to the document if needed.
As if that weren't fabulous enough (I know, it sounds like I am selling it, but I am really just this excited), you can download the KeY!!!!!
I know!!!  Can you see why Opus Math is my new favorite find???!!!??  My mind is racing...I could download one question a day on a half sheet of paper for a bellringer, take a screen shot and throw it on my whiteboard for an exit ticket, or have all of my assessments created before school starts.
Opus Math = Love!!!