Pages

Friday, August 31, 2012

Favorite Find Friday: Silent Math Movie

The iPads have not yet arrived, but school is in full swing and we are harnessing the power of the students' cell phones.  In the first 10 days of the school year, we have used phones to communicate, create math tutorials, and assess understanding!!!  In preparation of the iPads' arrival, I have uploaded another project to the class website using a favorite app which was generously shared at Mobile 2012 by TechChef4U.  #MyFavFriday app, Vintagio, transforms any video captured on an iPhone or iPad into a period style movie, complete with special effects and music. Vintagio, previously known as Silent Film Director, can be used to create everything from a 20's style silent film to a 70's style home movie and everything in between.  It is quick and easy to use and allows for film editing, special effects, photos and images, transitions and insertion of title cards.

In the Silent Math Movie project, the students will create a math tutorial without words.  I am so excited to see what the kids will do - their first project with iMotion HD was fantastic!  I'm including the task, sample video, and rubric just as the students will see it.

Task:
"After the depression of the 1890s, immigration jumped from a low of 3.5 million in that decade to a high of 9 million in the first decade of the new century. After the 1880s, immigrants increasingly came from Eastern and Southern European countries, as well as Canada and Latin America. By 1910, Eastern and Southern Europeans made up 70 percent of the immigrants entering the country."  - Eye Witness to History

The earliest American films, which appeared around 1895, were primarily a working-class pastime. Because they told stories without words, they appealed to the large, immigrant population in the United States.  A picture that did not talk was particularly appealing to people who did not speak or read English. - History Matters

Your task is to go back in time and create a movie "showing" how to solve a specific mathematical problem using the  Vintagio app. The challenge?  You must work without words in groups of 2 to create a 2 - 5 minute film that will serve as an easy to understand Math Tutorial for your classmates.  Have fun with this project; part of the appeal of silent films were the creativity directors used in lighting, props, costumes, and movements of the actors.  This is your opportunity to let your creativity shine!
Image From Chaplin Museum

Sample: Math Tutorial


Rubric:
Click for larger view

Giveaway:
Want to try #MyFavFriday app, Vintagio, in your classroom?  MacPhun, LLC has generously donated a free code for me to share!  Enter via the Rafflecopter widget below:
a Rafflecopter giveaway

Tuesday, August 28, 2012

The Good, the Bad, and....the Polka Dots of Back 2 School Night

     Tonight was Back to School night; my one chance for the year to meet and greet my precious students' parents! Oh, as always I was so excited and eager to make a good impression. I had read a fantastic article earlier this week highlighting 3 key goals for hosting parents at B2S events. The author did a great job giving tips to make the night successful, but the first goal about showing love and support for the students resonated within me so much that... I kind of got stuck there.
       I am convinced that the tone set in the classroom for the 10 minutes you have with parents matters! All parents want to know that the teacher believes "their child" is just as wonderful as the parent thinks they are:) Wanting to make quite the impression, I scoured Pinterest for hours looking for the perfect "classroom happy". I finally settled on polka dots (my classroom's main theme:)

I polka-dotted bulletin boards, 


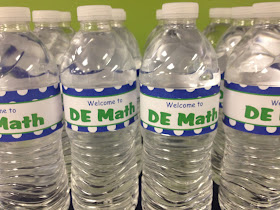
water bottles, 


m&m's and even my office worker ( ok, it was her hair bow). 

Clear packages filled with M&Ms and covered in custom wrap


Still reflecting on the previously read article, I thought of 1 Corinthians 13:1, the scripture that says you can do and be all kinds of wonderful things, but if you do not have love, you are but a noisy gong or clanging cymbal.
     To not be mistaken for a noisy gong, I really went all out and I am cracking myself up (to keep from groaning aloud) as I reflect on the night's presentation. Wanting to be sure to convey how wonderful I thought each child was, I am afraid I acted more like one of those hippie chicks at the airport handing out peace and love bracelets rather than a seasoned professional very capable of leading children through the two courses I am slated to teach.
     I honestly don't even remember even telling them my name, much less the fact that I actually have taught the courses for the past umpteen years with great student success. Or how about the fact that I have a degree or two and employ a variety of teaching strategies to meet the needs of each of the students?   What did I say? " I am LoVinG getting to know each of their children. The students are off to a strong start and working hard. I am always available to help and I fully expect their children to do great!" All of which are true, but I wish I had a do-over to add the...err...stuff that would probably reassure the parents that their children were being taught by a competent teacher. But since there are no do-overs, I trust that God will make up for my inadequacies and the parents, at least, will fondly remember the LoVinG teacher that supplied a light snack at B2S night:)
What was above the ECA, you may wonder? Of course... I "heart" ECA
Update:  Ok, it was killing me.  I sent a follow-up email this morning to all of the parents introducing myself and the classs.  I feel much better:)

Monday, August 27, 2012

Made 4 Math: Stop Motion Animation

     We are two weeks into the new school year and our iOS projects are in full swing.  Students are utilizing cell phones and iPads daily to elaborate upon and reconstruct content covered in class.  They are in essence creating their own version of the Interactive Student Notebook (ISN or INB), except their's are Digital Student Notebooks (DSN) :D  Students have to truly synthesize the information in order to effectively "teach" it and I certainly believe "teaching" helps them remember.  In fact, the National Training Institute (1999) stated that learners retain 5% of what they hear in a lecture, 10% of what they read, 20% of material presented both audibly and visually, 30% of what is demonstrated, 50% of what is discussed in groups, 75% of what they practice, AND 90% of WHAT THEY TEACH.
     Last week, my friend, Kathleen, introduced me to the coolest app used in this week's #Made4Math project, iMotion HD.  (She had students use it to summarize human migration research conducted in World History; I had students use it to create a math tutorial. We loved it so much that we highlighted it at The Classroom Cafe too!)) Here's a quick overview...the Dual Enrollment students created stop motion tutorials to review concepts covered in class and to re-teach others who may not have had a clear understanding.  Each group of students (I would recommend no more than 3 in a group - 5 was too many!) chose from several problem types.  Then, they utilized iMotion HD  to make their animations.
The details of the project including the task, a sample student created video, and the rubric are included for you to take and make your own:
StopMotion Math Task
Stop Motion animation debuted long ago in films.  The first instance of a stop motion film was seen in The Humpty Dumpty Circus in 1897.  It is often used to show objects moving on their own.  In a stop motion film, the animator makes inanimate objects "come to life" by moving the objects through a scene.  The films are created when a series of interlocking pictures are played together through a scene.  When all of the pictures play it looks as though the objects are actuall moving (kind of like a flip book). Your task is to assume the role of a stop motion animator and create a math tutorial film for our online course resources using the iMotion HD app.
Sample Student Video


Rubric
Click to View
The projects turned out great!  The free app was so easy to use.  I observed the students talking more about the curriculum content than the mechanics of making the movie. Yay!

Monday, August 20, 2012

Made 4 Math: Scratch Off Cards


Last week, inspired by someone's Scratch Off cards, I decided to try some of my own.  (Sorry, I scanned all of the posts listed, but couldn't find the source. Please let me know if this was inspired by YOU so that I can link to your blog.)  I had my student workers create an invitation for an upcoming Professional Development using the scratch off idea to make the announcement for PD a bit more interactive.  My student workers, high school juniors and seniors, got so excited about what they had created that they were literally showing everyone who would look.  By the time we put them in the teachers' boxes, we could hardly contain ourselves!
This week's #Made4Math project will hopefully capture the enthusiasm shared by the three workers and re-create it in the classroom.  I have created 4 sets of cards to review content covered over the past few days (exponents and radicals cards).  Each card has 4 questions (actually the same problem types they will see on an upcoming test).  The questions target the same focus skills but actual numbers vary slightly on each card.  I have outlined the 4 questions with a colored box to distinguish between card sets.  I will divide students into 4 groups by color: blue, green, red, yellow.  
The students will work each of the 4 questions in their notebook and compare answers within the group.  When the group settles on the correct answers, they will transfer all work to the question cards. They will then cover their work with clear packing tape and paint the tape with the scratch off solution: 2 parts paint and 1 part dish soap. We will let the paint dry and re-use the cards later to review again for the test.  This time students will trade cards with others from different color groups.  They will work each others' cards and then scratch to see if they are correct.  If answers are incorrect, students will be able to see each problem worked correctly and in detail so that they can discover what went wrong.  I know, I could review the 4 questions in a more traditional way, but I think the scratch off element (which takes all of 2 minutes to complete) will add a delightful twist :)
Use gray paint to cover cards quickly. Top with silver to add sparkle.

Friday, August 17, 2012

Favorite Find Friday: Wiffiti

We are finishing our first full week of the school year and it has been wonderful!  My new students are just delightful.  I have 18 in person and 18 on TV.  This is my first year to teach students in both north and south Louisiana at the same time, so it was important to me to foster a sense of community from the first day.  Typically, I would do just one "get to know you" activity and then move straight into content for the rest of the year, but a colleague said that she was doing a team building exercise everyday for the first week, because she found it helped her Calculus and Physics to establish collaborative relationships through the ice breaker games.  I figured if she was investing the time with students who probably knew at least a few other students in the class, I should do at least that much to cultivate relationships with students whom I had never met and between students from two different ends of the state.
As this week's bell ringer activities, we began the Time Capsule Project, completed an Interest Inventory, Mapped the Classroom (students in both schools created a diagram to keep in their notebooks to show where classmates at the other school were sitting), took a Faculty Facts quiz, and did #MyFavFriday activity, "About Me in a Tweet" via Wiffiti.
Let me just start by saying that this is by far the coolest thing we did all week to connect with one another!  The idea was adapted from Sarah's Math = Love "First Days" post in which students were to finish the sentence "Math is..." in 140 characters.  Sarah had a fantastic graphic for students to complete, but rather than have the students submit paper "tweets" (a challenge when EVERYTHING has to be faxed between schools), I used Wiffiti, an online message board.  The activity's' directions, "Using only 140 characters, tell us about yourself.  Post your response to Wiffiti."  I had created a Wiffiti board prior to class time and uploaded a first day class picture along with a message with the directions.
With Wiffiti, students did not need a Twitter account, because the website had a space for them to type their response, but those with Twitter or Instagram were able to upload their pictures using the class #hashtag.  As the responses began rolling in, the students in both locations went crazy as they saw classmates from 250 miles away communicating in real time through the use of their cell phones and computers.  Why was this so exciting when kids do this daily via texting and email?  It had to be that their messages were displayed jumbo-tron style through the class projector and on every computer screen in the room.  The squeals of delight said it all!

Wednesday, August 8, 2012

Class Website Ready to Roll

I truly feel like Frank on You've Got Mail.  You know, "The nut from the Observer who is in love with his typewriter", except I'm not a guy, I'm a girl.  And, I'm not in love with my typewriter... I'm in love with my NEW Class WeBsiTe!!! (Plus, I would like to think "nut" would be debatable from those who know me well:)  Last week, I posted about creating a class website header for my new online format.  

For this week's #Made4Math, I changed my First Day Handout so that it would match the header.

Then, I thought the handout was so-o-o cute with the lined paper background that I wanted to re-create it on my Weebly site.   Despite watching a You Tube video and reading several articles, I could never quite get my image to tile in the background like the tutorial showed.  It looked fine in the preview, but when I added elements to my page, the image was covered.  Long lead in to say that, I figured out a work around.  Here's what I realized...in Weebly, the page dividers are thin gray lines.  So I dropped a few page dividers on top of one another and stacked together they look like...are you ready...lined notebook paper!!!

And if you have notebook paper, you have to have paper clips and doodles:


I drew the clipart in ActivInspire and took screenshots of the doodles. Though lesson notes and assignments will be added as the year unfolds, the website is finally ready to launch.  Good thing, too - school starts tomorrow!  Here's a shot of the finished product: 
Live Site

Monday, August 6, 2012

Made 4 Math: First Day Handout

School starts for us in just 3 days!!!  I spent the weekend contemplating re-painting and totally changing my classroom.  My husband on the other hand...well, let's just say I would have been on my own on this one (which to his credit is VERY unusual for him.  He truly is THE most supportive spouse I know.)  So instead of creating total chaos for myself this late in the summer, I settled on adding a little pizzazz to my First Day Handout.  Earlier this week, I changed my class website header to resemble a composition notebook, so it was only natural for me to create for my #Made4Math project a matching first day handout.  In addition to the general class info in the handout, I included my Welcome Podcast (a previous #M4M project) via a QR code ( I also use QR codes to track calculators).  If you have never made a QR code, it really is as easy as 1-2-3!

I love the new look of my First Day Handout and I am sure it will look great with a classroom makeover for second semester:)
Publisher File for editing

Friday, August 3, 2012

Favorite Find Friday: Spreading School Spirit w/ Marble Magnets

In anticipation school starting, I spent the morning making Marble Magnets to spread a little school spirit.  I thought new teachers might like to have something with the school logo on it and the "new to me" students could use the magnets in their lockers.  These are super inexpensive and quick!  It took me less than an hour and I have enough tiny gifts to share with all of my new friends.

Materials I used:
  • Clipart w/school logo
  • Large, flat glass marbles - pack of 30/$1.00 @ Dollar Tree
  • Round magnets - pack of 52/$5.97 @ Walmart
  • Mod Podge
  • Sponge brush
  • Hot glue gun
  • Wax paper to protect the table
How I did it:
One page makes tons!
I created polka dot circles in Microsoft Publisher to use as a background for the school logo. (If you are polka dot fan like me, download the Publisher files for the dotted backgrounds in blackgray, greennavy, orangepinkpurplered, royal blue, and yellow.) The school logo was captured via a screenshot from the school's website.  I pasted the image onto each of the dotted circles.  ( I used Promethean's ActivInspire software to capture the image, but you could use Jing or another favorite tool to take the picture.)  I printed the Publisher file onto white cardstock using my home printer.

I placed a marble over the clipart on the printed page to make sure I had my spacing and image size correct.  I had to adjust the page a few times to get it just right.  The marbles are smaller than they look, so check to make sure it is correct before you spend the time cutting.  The clipart was cut so that it was smaller than the marbles.
Thin layer of Mod Podge


I used a sponge brush to apply a small amount of Mod Podge to the flat side of the marbles.


I placed the cut images in the center of the marbles and then, dabbed Mod Podge around the edges and over the top of the clipart.  Don't worry, the Mod Podge dries clear.)


After the Mod Podge dried, I used hot glue to adhere a magnet to the flat side of each marble.


Now, the reason this qualifies as a #MyFavFriday project is because my favorite find this week was a packaging idea from Madigan Made that transformed the marbles into a brightly colored packages sure to delight!  I started out with a package of metal washers from the hardware store, a package of blank index cards, a pack of Wilton treat bags (50/$2.50 @ Walmart by cake decorating supplies).  


I folded the index cards in half and used hot glue to adhere two washers to the inside of the folded card.

I re-folded the card in half and my magnets stuck right to the hidden washers.  I placed all inside the treat bags, folded and stapled a decorative piece of card stock (also made with Publisher) across the top of the bag, and now, I'm thrilled with the finished result!


Wednesday, August 1, 2012

Classroom Website Header and Page Dividers

Okay, with #Made4Math Mondays and #favFridays, I felt a little pressure to create a theme for this random post in the middle of the week....so, this is my #webWednesday :D  Seriously, this summer I have blogged quite a bit about moving my class's landing page from a blog format to a website.  By doing so, I hope to create a more permanent home for resources and assignments organized in units rather than by dates as they were on the blog.  Over the past few weeks, I have designed iPad projects, created a welcome podcast, and now, designed my website banner and page breaks for daily posts of online bellwork.  While I tossed around numerous design ideas (you know, I love my polka dots), I've decided to go with ....drum roll...the composition notebook black and white scheme.  So, without further ado...the banner:

and the page breaks:


(I just realized I should probably explain the logo; I teach two high school classes (ECA and LHS) simultaneously in one dual enrollment class.)  I kind of like the black, white and red scheme.  Anyone else maintaining a class website and wouldn't mind sharing?  I would love to see how you have your resources and assignments organized.